 AfterInspect
Contacts
Contacts is a list of the agents and clients you have worked with, built for you from your inspections. For agents it shows how many inspections each one has sent you and whether they are going quiet, so you know who to call. Only the account owner or an admin can open it. See Inviting your team for roles.
Before you start
There is no Add contact button. A contact appears when an inspection carries an email address or a phone number for that person, so fill those in on the inspection:
- Client: the Name, Email and Phone boxes on the new inspection form.
- Agent: open More details on the new inspection form and fill in Agent (optional): Name, Company, Email and Phone.
A name on its own is never enough, because two people can share a name. Contacts are matched on the email address first, and on the phone number when there is no email (a phone number needs at least seven digits). The same email on a later inspection is the same contact, whatever the name says. The first details recorded are the ones kept.
Read the list
Tap Contacts in the top bar.
Choose Agents or Clients.
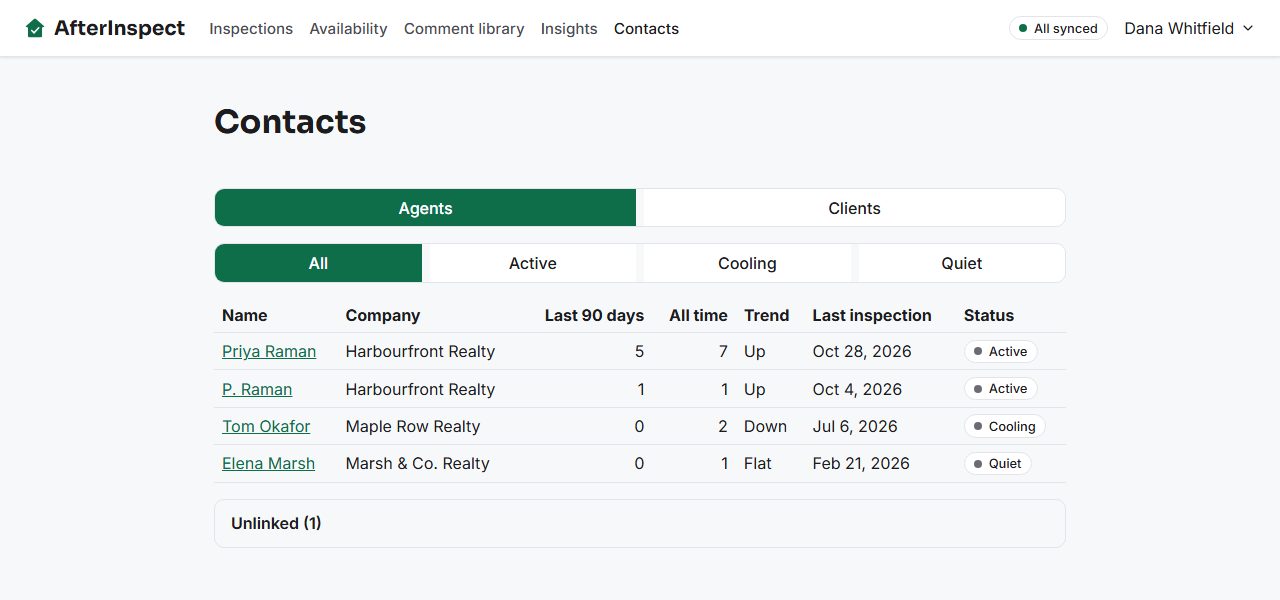
On Agents, each row shows the agent's Company, the number of inspections in the Last 90 days, All time, a Trend, the Last inspection date and a Status. The agents with the most inspections in the last 90 days come first.
Use All, Active, Cooling or Quiet to filter by status.

What the numbers mean:
- Only completed inspections count. A job still in progress, a booking request you have not accepted, a sample inspection and a re-inspection are all left out.
- Status is how long it has been since the agent's last completed inspection: Active is 90 days or fewer, Cooling is up to 180 days, and Quiet is more than that. An agent with no completed inspection yet is labelled New and only shows under All.
- Trend compares the last 90 days with the 90 days before that: Up when there are more, Down when there are fewer, Flat when the counts are equal.
The Clients tab is simpler: Name, Email, Phone, the number of Inspections and the Last inspection date. It has no status or filter.
Inspections that could not be linked
Below the table, Unlinked with a number counts inspections that name someone but have no email or phone, so they cannot be matched to a contact. Tap it to open the list: Name, Address and Date.

Tap the address to open that inspection's details, add an email or phone, and save. The person then joins the list.
Open one contact
- Tap a name in the table.
- The top of the page shows tiles: All time (with the date of the first inspection), Last 12 months, Last 90 days (with the count for the previous 90 days) and Status with the trend. If your account takes client payments, a Paid by clients tile is added, showing card payments received less refunds.
- Under Details, you can change Name, Email, Phone, Company (agents only) and Notes, then tap Save. The page says "Saved." Notes are only for you; clients and agents never see them.
- Inspections lists every inspection linked to this contact with its address, date and status. Tap an address to open it.

Merge duplicates
The same agent can appear twice, for example when one inspection used their work email and another their personal one.
- Open the contact you want to keep.
- Under Merge another contact into this one, choose the other entry in Contact to merge in. Only contacts of the same kind are offered.
- Tap Merge into and the name. The page asks "Merge (other) into (this one)? This cannot be undone."
- Tap Yes, merge. This cannot be undone, or Cancel.

The other entry's inspections move to the contact you kept and the other entry is removed. The contact you kept keeps its own name, email and phone; the removed entry's details are not copied across.
If something goes wrong
- You do not see Contacts in the top bar. Only owners and admins have it. Anyone else who opens the address sees "Only the account owner or an admin can see contacts."
- A person is missing from the list. Check Unlinked. If the inspection is not there either, it may not have a name, or the inspection is a sample or an unconfirmed booking request.
- Save says another contact already uses that email or phone. Two contacts cannot share one. Merge them instead.
- The merge fails. The page says "Could not merge these contacts. Try again." Check your connection and try again.
- An agent's name did not change when you typed a new one on an inspection. The contact keeps the details first recorded. Edit the name on the contact page.