 AfterInspect
The Finish setting up checklist
A new account starts with a short setup guide for your name, company and report look. What it leaves for later is kept on your inspection list as a Finish setting up checklist. Everything here is optional and can be changed later, so skip whatever you do not have to hand.
The setup guide
You land on the guide right after sign-up. It has two steps, shown across the top as Your branding and Your report. Skip setup at the top right leaves the guide at any point.
Your name and company. Fill in Your name and Company name. The company name goes on every report and booking page. Sign-up only asked for an email, so these start as placeholders.
Logo, colour and licence. Optionally (see Branding your report) choose a logo under Logo (optional), pick an Accent colour, and add Licence numbers (optional). The Preview at the bottom shows how the report heading will look.
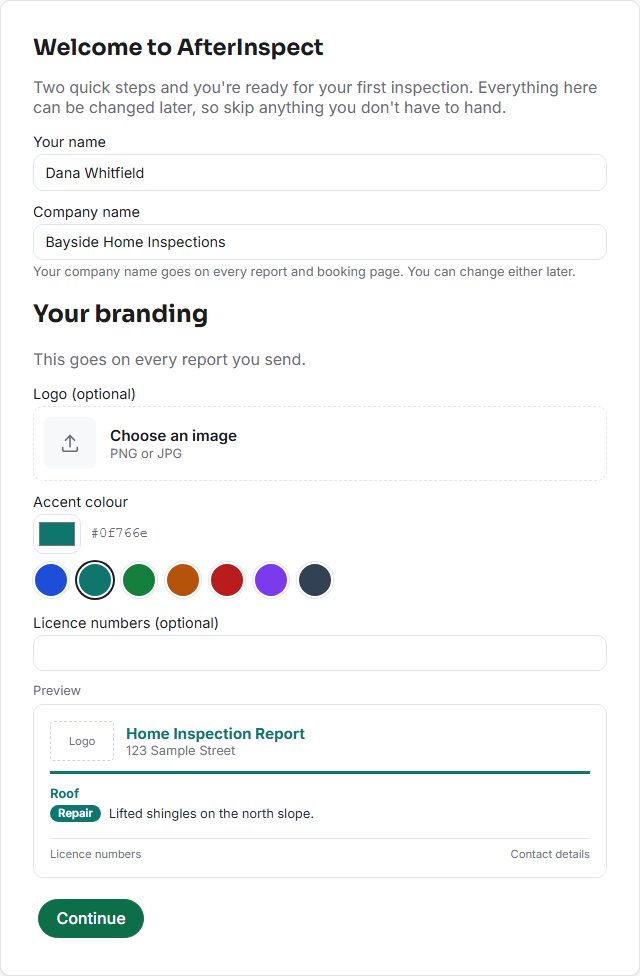
Tap Continue. Your name and company must save before the guide moves on. If they cannot, the guide tells you and stays where it is. The branding is saved too, but if that part fails the guide still moves on, and you can finish it later from Branding.
Your report. Optionally add Company contact details (Phone, Email, Address, Website), which show on every report in place of the contact block. You can also add one notice page: a Title and Text in your own words, such as the scope of the inspection or your terms. AfterInspect supplies no wording for it, so what you write is exactly what clients read. Give it both a title and text, or leave both empty.
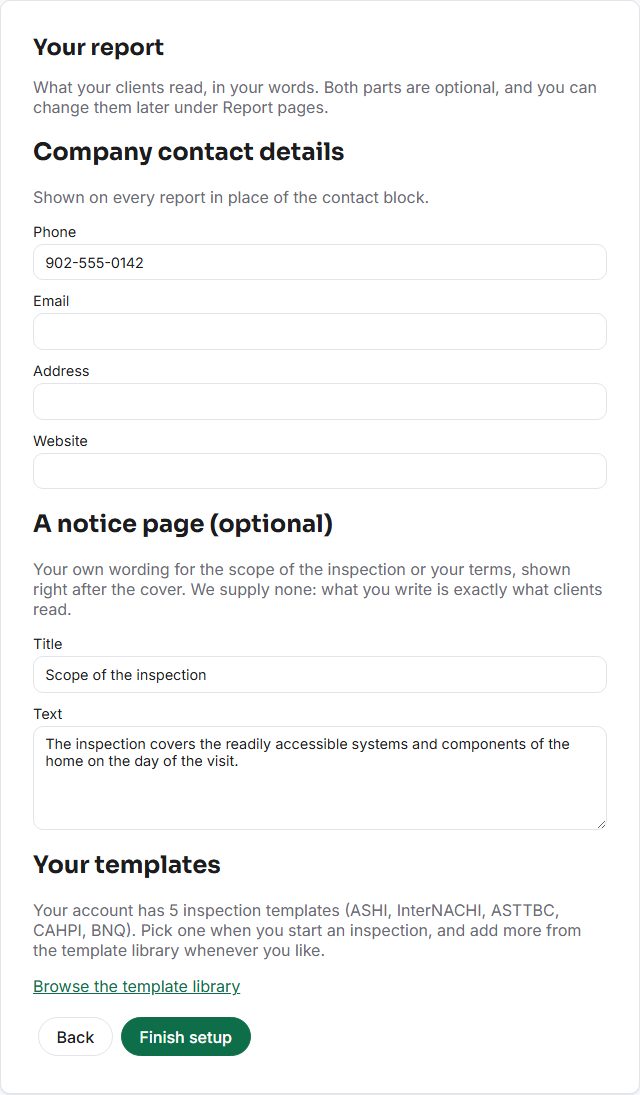
The same screen tells you how many inspection templates your account already has, with a Browse the template library link.
Tap Finish setup. Back returns to step one, with what you saved.


Your place in the guide is kept for the browser tab, so refreshing the page does not send you back to the start. If you already have a notice page, the guide shows how many instead of asking again. Contact details and notice pages need the account owner or an admin; for anyone else the second step is only a way to finish.
To go through the guide again, choose Run the setup guide again on the account Overview page.
The Finish setting up card
After the guide, your inspection list shows a card headed Finish setting up: "A few things your clients will notice. Each takes a couple of minutes, in any order."

Each line is a link to the page where you do it:
- Add the templates you use opens the template library under Account. See Templates and add-on sections.
- Add your notice pages and contact details opens Report pages. See Report pages.
- Write your inspection agreement opens Agreement. See Pre-inspection agreement.
- Take payments from clients opens Payments. This line is left out where client payments are not available.
- Set your availability for bookings opens Availability. See Online booking and availability.
- Invite your team opens Team. See Inviting your team.
A line gets a green tick from what your account has saved: contact details or a notice page, a written agreement, payments ready, booking switched on with your time zone set, or more than one person on the account. The templates line is ticked once you have opened the template library on this device. The guide's second step already saves contact details or a notice page, so that line is ticked as soon as you finish it. A line stays a link after it is ticked, so you can go back and change it. If something fails to load, its line simply shows as not done.
Tap Hide this to dismiss the card. It stays hidden on this device.
Who sees the card, and for how long
Only owners and admins see it, and only while the account is new, meaning fewer than three inspections. Once you have three or more, the card stops showing even if lines are unticked. It is also hidden while the account is read-only (see Plans, the trial and billing).
If something goes wrong
- The card is missing. You may have hidden it, you may have three or more inspections, the account may be read-only, or you may not be an owner or admin. Hiding is remembered per browser, so another device shows the card again.
- A line is not ticked though you did it. The tick comes from what the server has saved, and the card only checks when the page loads. Reload the list. If it still is not ticked, open the page and confirm it saved.
- You skipped the guide. Nothing is lost. Use Run the setup guide again, or open each page from the card.
Next: Your first inspection.